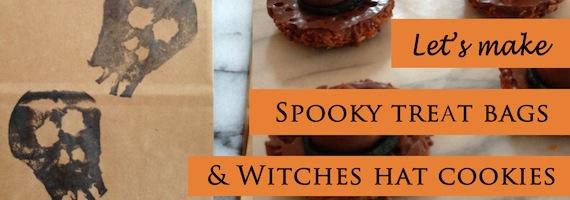
Is your service member missing Trick-or-Treat back home this year thanks to deployment? Don't fret! These witches hat cookies are the perfect treat for their Halloween care package! The spooky, skull-stamped bags keep the cookies packaged in theme for shipping and bring a little Halloween magic to your deployed Soldier, Marine, Sailor or Airman, wherever they are. Plus, the witches hats only take a few minutes to assemble, so your care package will be assembled in no time.
You'll Need:
For the cookies:
One box of round cookies with one chocolate side (Keebler's coconut Samoa knock-off worked well here)
One tube of icing - either orange or black
One bag of Hershey's Kisses
For the bags:
One potato
A knife
Paper bags
Ribbon
Black ink pad
Let's get started! First... the cookies!

Step One: Assemble your ingredients
This is really the easiest little cookie to throw together, and it looks pretty cute and Halloweeny when it's all done. So grab your cookies, your icing, and your kisses and let's get started.

Step Two: Assemble the hat
This step could also be called, "try not to eat your weight in Hershey's kisses while you unwrap them for the cookies," because that was my biggest challenge. But seriously, unwrap the kisses so you have them to put on top of the cookies, and lay the cookies out on a sheet of parchment paper, chocolate side up. With a squeeze of icing, affix the kiss to the cookie.

Step Three: Let them set
You'll need to let the icing dry, which will take about half an hour. Then they'll be ready to package. While we wait, let's make the spooky stamped bags we'll package them in!

Spooky Stamped Bags
Step One: Prepare the potato stamp
This one is pretty simple, although it looks a little tricky. To make the stamp, cut the potato in half, and draw whatever you want your design to be on the potato half. I wanted a spooky skull, but you could just as easily do a ghost or a pumpkin.

Step Two: Carve the stamp
To create the stamp, we're going to carve away the image from the potato so that there is no negative space.

Step Three: Stamp the bags!
Now the fun part: Stamp your design all over the bags! I used black ink because I thought it would look best on the paper bags, but you can use whatever colors you would like. Remember in elementary school when potato stamped tee-shirts were the height of summer camp project cool? I love that with these bags, they still can be. Potato stamps forever!

When that's all done, you can assemble your package. I put my witches hats into the bags and tied them with a very non-spooky bow, but that's because I'm the sort of girl who loves bows and fun ribbon. For the sake of shipping, you'll probably want to put these into a plastic container or a sealable bag, just so bugs don't get in, so you don't even have to seal the bags if you don't want to. Whatever you choose to do, when your servicemember opens a Halloween box to these, he or she will be mighty impressed with your awesome trick-or-treat craftiness!

")